Note: the below tutorial is currently outdated. Please reference this tutorial at this off-site link for the time being. This website is safe to access and belongs to an SDSU alumni. http://p.aradi.se/twine101.html
***
OLD TUTORIAL (use at your own risk):
Begin by downloading the program for your operating system (Windows, Mac OSX, or Linux) from twinery.org, Twine’s official website. The version you download may be newer than the version that is discussed in this tutorial, but most aspects of the program should be similar.
Be careful downloading Twine from any website that is not twinery.org, as you may not be downloading the program you want but instead may download something malicious.
Safely download the most recent version of Twine for your operating system here:
Once the file downloads, you will need to open it and install Twine; this is a different process that depends on what operating system you are using. Generally speaking, the downloaded file may be on your desktop or in your browser’s download file.
Once you open the file and begin to install it, you may receive a warning stating something among the lines of, ‘the origin of this program cannot be verified.’ This is just a built-in security feature some operating systems have. As long as you downloaded Twine from twinery.org, your download is safe to be opened and installed.
***
Once the program has been downloaded, opened, and installed on your computer, we need to open the program.
Begin by clicking the Twine icon wherever the program is located. If you cannot find the icon, try searching your computer for ‘twine’; this should yield the program.
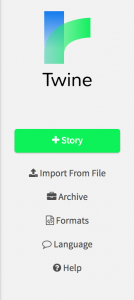
To begin a new project, click +Story:
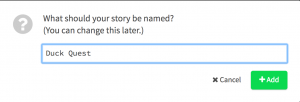
You now have a blank project. Go ahead and name the file ‘Duck Quest’; you can change the title later. We are naming the project now, at the start, so we can save our progress.
You do not want to lose your progress! Though this version of Twine saves automatically, select publish to file and save different versions of your project. We will look deeper into this later as a method of coding, but for now just know Twine tends to be unstable on Macs and likes to crash, and sometimes Twine’s auto-save feature is not enough to save your work.
Now that you have a new project, you will now see a screen like this:
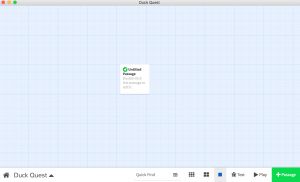
This is our user interface. In the center of the screen there is a white box; this is a passage.
The backbone of Twine are its passages, also known as lexia or nodes. For the sake of Twine we will be calling these feature passages.
Twine operates via these passages. All content is contained within them.
The amount of passages is completely up to you; there is no maximum amount, though at a minimum you will need the beginning passage which you can name anything.
Passages will usually connect to each other (it depends on your project).
Passages connect via links, or hyperlinks. By connecting passages via links, your project becomes a hypertext. The Web operates via hypertext: think of an encyclopedia website, or any website you frequent. Everything depends on a network of links.
Before we start linking our passages together, however, let’s continue to explore the interface.
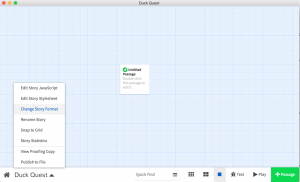
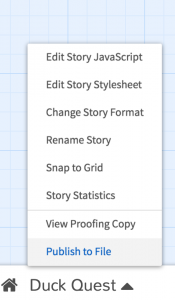
If you click on the title of your project in the bottom left-hand corner, a menu will appear. This menu contains some important features which will be explained later; for now, click change story format.
The default story format for this version of Twine is Harlowe 2.0.1.
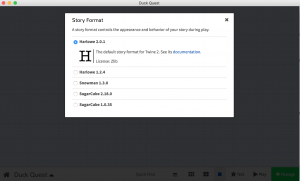
For the sake of learning Twine, we want to change the format to Sugarcube 2.18.0.
Think of the story format as the canvas you are working on. The way you program your story and create the aesthetic design of your project depends on the format. The built-in story formats will enable you to create and publish a project immediately, and each format looks somewhat different. When we begin to use cascading style sheets (CSS) in our project, we will be overriding these story formats. More on this later. For now, we are not going to use Harlowe.
Go ahead and select Sugarcube 2.8.0, the second choice from the bottom. It okay if your version of Sugarcube 2 is 2.21.0 or something similar, just as long as it begins with a 2.
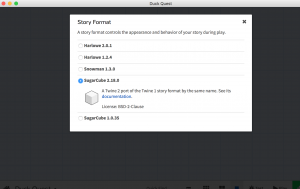
We will be using Sugarcube 2 because it is slightly more user-friendly than Harlowe, and easier to edit in terms of its cosmetic interface.
Go ahead and click outside of the white box. You will be returned to the former screen.
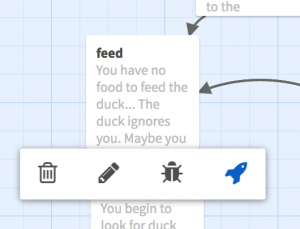
Hover your cursor over the white box (the passage) in the center of the screen. A menu will pop up. Note that in some versions of Twine the rocket icon no longer exists — this isn’t a big deal, so just ignore any rocket-related content in this tutorial if it does not apply to you.
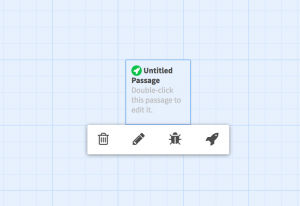
We see a trash can, a pencil, a bug, and a rocket icon. For now we only care about the pencil as it enables us to edit the passage. You can also simply double click any passage in order to edit it.
Note that you can only edit one passage at a time.
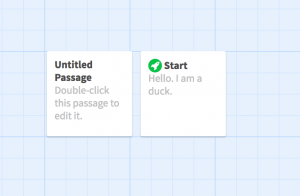
When you select a passage to edit, a window like this will pop up:
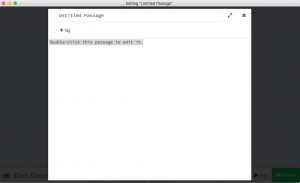
We now have a blank passage opened up on our screen. Let’s break down the contents of this passage.
We have the title of the passage at the top of the prompt: it currently reads Untitled Passage. You can click in the box and type the name of your passage. Let’s name it Start.
Depending on how you design your project, this passage title can be visible or invisible when users view your project. In this project, and for most projects, the title will be invisible. Usually, programmers in Twine name the passages so they can keep track of what they are creating (for example, Bob’s dialogue one, Bob’s dialogue two).
+Tag is a space for tags. Don’t worry about this right now. You can create an entire project without tags. They are very useful features but will be discussed later on.
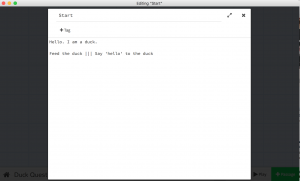
The body of the passage editor will say ‘Double-click this passage to edit it ‘ when you first open the passage. Go ahead and type whatever you want here — for the sake of the tutorial, type:
Hello, I am a duck.
Press your enter key twice to make two new lines. Now type:
Feed the duck ||| Say ‘hello’ to the duck.
The three lines ||| are purely aesthetic; they will be separating what will eventually be two links. Separating the two links will help viewers differentiate between one link and the other, but you do not have to put these lines. They have no functional bearing on the project and are purely cosmetic.
You can change the content later, and we will be returning to this passage to add hyperlinks.
To close/save the passage, either click the ‘x’ in the top-right corner or just click outside of the editor in the negative space surrounding the white box. The version of Twine this tutorial is created for saves your progress automatically, but you should be making back-up exports of your project just to be safe.
Now let’s create another passage. As discussed previously, Twine is a hypertextual tool.
To create a passage, click the green button in the bottom right-hand corner that says +Passage.

A new white box will appear to the left of your start passage.
Let’s edit this new passage. We will now click on the passage that we wish to edit and begin to fill out the editor that pops up.
We have established in our start passage that in our story, the player has encountered a duck and has been given two choices: feed the duck or say hello. Because there are two choices, we will need two new, different passages for each choice. Let’s create another passage.
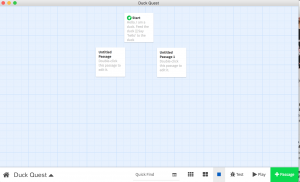
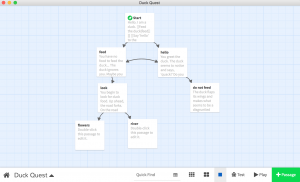
Notice here that I have arranged the passages in a certain pattern; this is a personal preference. You can move any passage wherever you wish on the interface. Where you place each passage is up to you and has no cosmetic or functional bearing on your end project.
We now have two passages to reflect the two choices presented in our start passage.
Let’s start with the ‘feed the duck option’, which can be either of the passages we just created. For this purpose of this tutorial, the ‘feed’ option will the passage on the left.
Open this passage (Untitled Passage) and name the passage something like ‘feed’. Twine is case-sensitive, so the easier your titles are for you to remember and type out correctly, the better.
In the body of the editor, write:
You have no food to feed the duck…
The duck ignores you.
Maybe you should find some duck food?
We are beginning to gamify our story by presenting this challenge, which is acquiring food for the duck. Let’s create the other option – ‘saying hello’ – before we add hyperlinks to this passage about feeding the duck.
Close the ‘feed’ passage open Untitled Passage 1 on the right. Name the passage hello and type:
You greet the duck. The duck seems to notice and says, ‘quack!’
Do you want to feed the duck?
We are now more than ready to start adding hyperlinks!
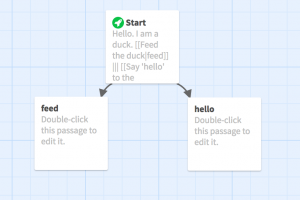
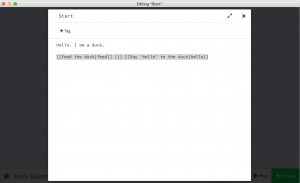
Let’s return to the Start passage. Open it up and type this below:
‘Hello. I am a duck.’:
[[Feed the duck|feed]] ||| [[Say ‘hello’ to the duck|hello]]
Let’s breakdown Twine’s version of a hyperlink.
[[Feed the duck|feed]]
Everything between the the double brackets is a part of the link. The link is feed. When the player clicks upon this link, it will take them to the passage called feed.
The text the player will click on will show up as ‘Feed the duck’. The line | between the text and the word feed separates the clickable text from the passage that is being called.
There are ways to randomize passages and do other fancy things, but for now this is how a link is created in Twine 2’s Sugarcube format.
We have a second link separated by three lines ||| As previously mentioned, these lines are purely cosmetic and a way for the player to differentiate that there are two links and two options being presented to them.
Notice that the second link is calling the passage hello. When the user clicks the ‘say hello’ option, they will be brought to the passage called hello.
Click outside of the box. You should now see the following:
The start page is now connected, or linked to both feed and hello. If you linked to either passage incorrectly, you will see something like this:

Notice the hello passage is not named hello, therefore the link in the start passage is broken. This is easy to fix: just open Untitled Passage 1 and name it hello.
You may encounter broken links if you capitalize your passage titles but forget to capitalize them when creating links (for example, trying to link to a passage called Food but typing food, lowercase, in your link).
Let’s now add some links in feed and hello.
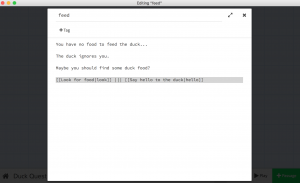
Open feed. Add the following text to what is already in the passage:
[[Look for food|look]] ||| [[Say hello to the duck|hello]]
We do not have a passage called look yet, but we will make one.
Type the following into the body of the editor:
You begin to look for duck food.
Up ahead, the road forks. On the road covered in flowers, there is a sign that reads ‘DUCK FOOD THIS WAY’.
Down the other path, you can hear the faint noise of what sounds like a river.
[[Choose the flower-laden path|flowers]] ||| [[Choose the path that leads to a river|river]]
We now need two more passages. Name one flowers and the other river.
We are beginning to create a fully-fledged hypertext!
Let’s now go back to the hello passage and add another option for the player: the player will have the choice to feed the duck or to not feed the duck. Open the hello passage and type:
You greet the duck. The duck seems to notice and says, ‘quack!’
Do you want to feed the duck?
[[Yes!|feed]] ||| [[No, the duck is fine|do not feed]]
We already have a passage called feed that we have created earlier, but we need a passage called do not feed. Create the passage and name it do not feed, then type:
The duck flaps its wings and makes what seems to be a disgruntled duck sound. Slowly, it waddles a way.
THE END
Notice that there is no hyperlink: we have ended one version of the story with this passage, which is common with choose-your-own-adventure stories. We will now return to the passage flowers and finish up our story.
Open the river passage. Add the following:
The path leads down a small hill where a brook winds about lazily amid the many willow trees.
A flock of ducks quacks about in the water. They see you begin paddling to where you stand on the river bank. The ducks seem happy to see you even if you do not have food!
You have made 10 ducks friends, congratulations!
THE END.
We have now ended this portion of the story and have a total of two different ends. Let’s also end the story in the flowers passage as well, just so this project is finished. We will be returning to our completed story and adding pictures and dynamic content in the next tutorial.
Open flowers and type the following:
Walking along the flower-strewn path, you are keen to find the promised duck food. Finally a small brick building appears amid a cluster of trees. Seated outside in a rocking chair is a woman with gray hair. She seems to be asleep.
There is a sign outside of the home that reads ‘DUCK FOOD’, but sadly a handwritten ‘SOLD OUT’ sign sits right next to the first sign. You sigh in defeat.
THE END
A bit anti-climatic, but we will return to this story in the next tutorial. For now let’s view, export, and upload our story to the Web.
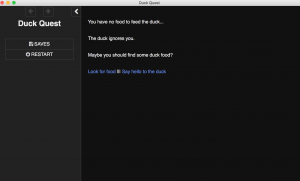
To view your story at any time, click play.

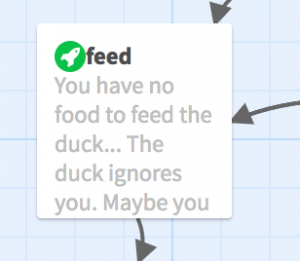
Your project will begin from the start passage. To preview your project from another passage, you will need to put the rocket ship icon on that passage (ignore this if your version of Twine does not use the rocket):
To do so, hover over the passage you wish to start from and click the rocket icon.
Now the passage will look like this:
And when we preview the passage, you should see this:
Let’s now export our project and prepare it for the Web.
Click the title of your story which is down in the bottom left. Select publish to file.
This prompt will pop up:
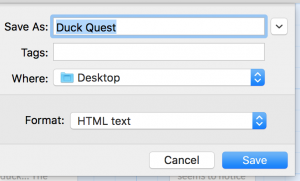
The ‘save as’ name will be what your file is called online.
Don’t worry about tags.
Save the file wherever you want. Here I am saving it to the desktop.
Leave the format as HTML: do not ever change this format or your project will not work when you try and put it online.
Click ‘save’.
You now have a file called Duck Quest.html on your desktop. If you double click the file, the project you just made will open in a browser window! However, we need to place this file online so everyone else can play it.
To do so, you have several options.
If you have a Twitter, or just want to make a throwaway Twitter, you can use Philomela, which will host your Twine project for free. If you do not want your project show up on the Philomela twitter’s timeline, make sure you uncheck ☑ announce my game on @philomela_twine at the very bottom of the page BEFORE you click publish.
https://neocities.org is another free website with a very nice community. Simply upload your project as it is – you don’t need to change its name or the .html extension – to your neocities account.
Alternatively if you pay for your own hosting space and own a domain name, you can of course upload this Twine project to your website. Owning your domain name and paying for hosting does not have to be expensive or difficult, and should be something you should look into if you think you will be spending a lot of time creating digitally-borne content.
You now have a working Twine project that is hosted and playable online. Congratulations!
***
In the next section, we will learn how to add images.
If you believe you have made an error, please check the troubleshooting section.
If you are looking to add dynamic content or further resources, click here.
***
Questions? Please email me here: kherr@sdsu.edu